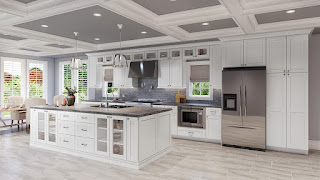
DIY Shaker-Style Kitchen Cabinet Plans for Home Projects
Transform your kitchen with the timeless elegance of Shaker-style cabinets. Forget expensive contractors â€" this comprehensive guide empowers you to build your dream kitchen cabinets yourself, saving money and gaining immense satisfaction. We'll walk you through every step, from detailed planning to the final finishing touches, ensuring a professional-looking result you can be proud of.
Planning Your Shaker Cabinet Project
Before you even pick up a saw, meticulous planning is crucial. Start by measuring your kitchen space accurately. Consider the layout, appliance placement, and desired cabinet configuration. Sketch your design, noting dimensions for each cabinet: base cabinets, wall cabinets, and any corner units. This detailed blueprint will be your roadmap throughout the project. Don’t forget to account for countertop overhang, backsplash, and any integrated appliances like ovens or dishwashers. Choosing the right wood is also paramount; consider factors like budget, durability, and aesthetic preferences. Popular choices include maple, birch, and pine, each offering a unique grain and finish potential.
Essential Tools and Materials
Gather your tools and materials before commencing. This will streamline your workflow and prevent frustrating delays. Your tool list should include, but isn't limited to: a table saw, a miter saw, a planer, a router, clamps, various drill bits, a sander, and measuring tools. As for materials, you'll need your chosen wood, wood glue, screws, hinges, cabinet pulls, paint or stain, and finishing materials (primer, varnish, etc.). Creating a detailed shopping list organized by category will ensure you have everything you need, avoiding extra trips to the hardware store.
Building the Cabinet Boxes
Constructing sturdy cabinet boxes forms the foundation of your project. Begin by cutting your wood to the precise dimensions specified in your plan. Use a table saw for accurate cuts, ensuring clean, square edges. Assemble each box using rabbet joints or dadoes for strength and a clean look. Apply wood glue liberally to all joining surfaces and secure with clamps until the glue sets completely. Pre-drilling pilot holes before driving screws prevents wood splitting. Once the glue is dry, remove the clamps and carefully inspect your work for any imperfections.
Adding Shaker-Style Doors and Drawers
The iconic Shaker style lies in its simple yet elegant door and drawer fronts. Cut the face frames to size and assemble them using rabbet joints. The panels should fit snugly within the frame. Use a router to create a clean, recessed profile for the panel. Accurate measurements are crucial for a consistent, professional look. Install the doors and drawers using high-quality hinges and slides. Remember to pre-drill pilot holes to avoid damaging the wood. Precise alignment ensures smooth operation and a polished finish.
Finishing Your Shaker Cabinets
The finishing touches elevate your DIY Shaker cabinets from good to exceptional. Sand all surfaces thoroughly using progressively finer grit sandpaper to achieve a smooth finish. Apply a primer to prepare the wood for paint or stain. Choose a high-quality paint or stain that complements your kitchen's overall aesthetic. Apply multiple coats, allowing each coat to dry completely before applying the next. Finish with a protective clear coat (varnish or polyurethane) for durability and protection against moisture and everyday wear and tear. Install your chosen hardware (hinges, pulls, knobs) to complete your stunning new kitchen cabinets.
Installation and Final Touches
The final stage involves carefully installing your completed cabinets. Begin by securing the base cabinets to the walls using appropriate wall anchors. Ensure they are level and plumb to provide a solid foundation. Install the wall cabinets using sturdy brackets, ensuring secure attachment. Finally, install countertops, backsplash, and any necessary trim to complete the transformation. Take your time and carefully adjust for any minor imperfections. Your beautiful, custom-built Shaker-style kitchen cabinets will be the highlight of your kitchen renovation.
Remember: safety first! Always wear appropriate safety gear such as eye protection, dust masks, and hearing protection when operating power tools.


0 comments:
Post a Comment
Note: Only a member of this blog may post a comment.