Tuesday, November 12, 2024

How to Craft a Squirrel Den Box in Easy Steps

Building a Squirrel Den Box: A Simple Guide to Encouraging Fuzzy Friends

Hey there, nature lovers! Ever wanted to provide a cozy home for those adorable, bushy-tailed squirrels scampering around your backyard? Building a squirrel den box is a fantastic way to attract these playful creatures and contribute to their well-being. It's a surprisingly easy project, even for beginners. Let's dive in and build a haven for our furry neighbors!

Planning Your Squirrel Den Box

Before we get our hands dirty, let's plan out the details of our squirrel haven. Consider these factors:

Location, Location, Location!

Squirrels are naturally cautious creatures, so finding the right spot for your den box is crucial. Choose a location that:

  • Offers protection from predators like cats and hawks.
  • Provides ample shade during hot weather.
  • Is close to trees or branches for easy access.
  • Is at least 10 feet off the ground, ideally higher for extra security.

Remember, a squirrel's den should be a sanctuary, not a target for unwanted attention.

Choosing the Right Materials

You'll need sturdy and weather-resistant materials to create a long-lasting den box. Here's what you'll need:

  • Wood: Use untreated, rough-sawn lumber like cedar, pine, or redwood. These woods are naturally resistant to decay and insects. Avoid pressure-treated wood, as it contains chemicals harmful to squirrels.
  • Screws: Choose galvanized screws, which are rust-resistant and won't weaken over time.
  • Metal flashing: This will protect the entrance from the elements.
  • Paint (optional): Use non-toxic, outdoor paint if you want to add a splash of color.

Design Considerations

Think about the squirrels' needs when designing your den box. Here are some important points:

  • Entrance size: Make the entrance hole about 4 inches in diameter. This will allow squirrels to enter easily but keep out larger animals.
  • Interior space: Aim for a minimum interior space of 12 inches wide by 12 inches deep by 12 inches high. This will provide ample room for nesting and raising young.
  • Ventilation: Add a few small holes on the sides of the box to allow for air circulation.
  • Roof overhang: A slight overhang on the roof will help protect the entrance from rain and snow.

Building the Den Box

Now, for the fun part! Let's build that cozy haven for our bushy-tailed friends. Follow these steps:

1. Assemble the Base and Walls

Start by cutting the wood for the base and walls according to your design. Use screws to securely attach the walls to the base, creating a rectangular box. Make sure the bottom is solid to support the weight of the nesting material.

2. Create the Entrance

Cut a circular opening (4 inches in diameter) on one of the walls to create the entrance hole. This opening should be high enough off the floor to prevent young squirrels from falling out.

3. Install the Roof

Cut two pieces of wood for the roof and attach them to the top of the box, creating a slight overhang. You can use hinges to create a removable roof for easier access. This will also allow you to inspect the box and clean it out periodically.

4. Add Ventilation

Drill several small holes on the sides of the box for ventilation. These holes will allow fresh air to circulate, preventing the den from becoming stuffy and damp.

5. Protect the Entrance

Attach a piece of metal flashing over the entrance hole to prevent rain and snow from getting inside. You can also add a small piece of wood, creating a "lip" to help direct water away from the entrance.

6. Paint (Optional)

If you're feeling creative, you can paint the box with non-toxic, outdoor paint. Choose a color that blends in with the surroundings. However, keep in mind that squirrels prefer natural colors and may be less likely to use a brightly colored box.

Installing the Squirrel Den Box

We're almost there! Now let's get that cozy den box in place. Follow these tips:

  • Secure Mounting: Secure the den box to a sturdy tree branch using heavy-duty straps or brackets. Make sure the box is securely mounted to prevent it from falling.
  • Height: Mount the box at least 10 feet off the ground for maximum safety.
  • Orientation: Position the entrance hole so that it faces away from prevailing winds and heavy rainfall.
  • Initial Placement: Don't be surprised if it takes some time for squirrels to discover and accept the new den box. Don't be discouraged if you don't see any activity right away. Keep it in place and the squirrels will eventually find it.

Enhancing the Den Box

Once your squirrel den box is in place, you can add some extra touches to make it even more inviting.

  • Nesting Material: Place a small amount of nesting material in the box, such as shredded paper, dry leaves, or soft grasses. Squirrels will add their own materials to create a cozy nest.
  • Food and Water: Provide a nearby food source like a bird feeder or a small dish of nuts. You can also add a shallow dish of water for drinking and bathing.
  • Observation: Keep a safe distance when observing the squirrels in their den. Don't disturb them or approach too closely, as they might abandon the box if they feel threatened.

Enjoy Your New Squirrel Neighbors!

Congratulations! You've created a cozy haven for those playful squirrels and are contributing to their well-being. Enjoy watching them scamper around and explore their new home. Remember, building a squirrel den box is a rewarding experience that connects you with nature and allows you to observe these fascinating creatures up close.

Happy squirrel watching!
Read More..
How to Build a Large Birdhouse for Wild Birds and Pets

Building a Large Birdhouse for Wild Birds and Pets

Providing shelter for birds, whether wild or domesticated, is a rewarding endeavor. A large birdhouse can offer a safe and comfortable haven for a variety of species, promoting biodiversity and enhancing your backyard habitat. This comprehensive guide will walk you through the process of building a spacious birdhouse, ensuring both aesthetic appeal and functional suitability.

Materials and Tools

Before embarking on the construction, gather the necessary materials and tools:

Materials:

  • Weather-resistant plywood or cedar boards (1/2-inch thickness)
  • Exterior-grade paint or stain (optional)
  • Roofing shingles or metal roofing
  • 1-inch diameter dowel rod (for perches)
  • Screws (1-inch and 2-inch lengths)
  • Heavy-duty hinges (for the roof)
  • Weatherstripping or caulk
  • Birdhouse entrance hardware (optional, for bird safety)

Tools:

  • Circular saw or jigsaw
  • Drill with various drill bits
  • Measuring tape
  • Level
  • Hammer
  • Screwdriver
  • Safety glasses
  • Pencil

Planning and Design

Before cutting any wood, meticulously plan the dimensions and design of your birdhouse. Consider the following factors:

Bird Species:

The size and shape of the birdhouse should be appropriate for the intended occupants. Research the preferred nesting habits of the birds you wish to attract. For example, a large birdhouse suitable for wood ducks would be significantly different from one designed for bluebirds.

Location:

Choose a location that provides ample sunlight and protection from predators. The birdhouse should be placed at least 5 feet above ground and away from dense foliage that could obstruct predator access. Consider attaching it to a sturdy tree or post.

Ventilation and Drainage:

Adequate ventilation is crucial for preventing moisture buildup and mold growth. Incorporate ventilation holes on the sides or roof of the birdhouse. A slight slope on the roof will aid in water drainage.

Construction Steps

Follow these step-by-step instructions to build a large birdhouse:

1. Cut the Base and Sides:

Using your chosen wood, cut the base, two side panels, and a back panel to the desired dimensions. The base should be wider than the side panels to provide a stable platform.

2. Assemble the Base and Sides:

Attach the base to the two side panels using screws. Securely connect the back panel to the sides, forming a rectangular box. Ensure all joints are tight and secure.

3. Create the Entrance:

Cut a circular or rectangular entrance hole on one of the side panels. The size of the entrance will depend on the type of bird you are targeting. Use a jigsaw or circular saw to create a clean and smooth opening.

4. Install the Perches:

Attach 1-inch diameter dowel rods to the interior walls of the birdhouse as perches. Ensure they are positioned away from the entrance to prevent blocking access.

5. Build the Roof:

Construct the roof using two pieces of plywood or cedar. The roof should be slightly larger than the base to provide overhang. Attach hinges to one side of the roof, allowing it to open for cleaning and inspection.

6. Add Roofing Material:

Cover the roof with roofing shingles or metal roofing for protection against rain and wind. Use screws to secure the roofing material in place.

7. Install Weatherstripping:

Apply weatherstripping or caulk around the entrance hole and the roof edges to seal gaps and prevent drafts. This will also help keep out moisture.

8. Paint or Stain (Optional):

If desired, apply a coat of exterior-grade paint or stain to the birdhouse for added protection and aesthetics. Choose colors that blend in with the surrounding environment or create a bold statement.

9. Install Birdhouse Hardware (Optional):

Consider installing birdhouse hardware for increased bird safety. This may include predator guards, a squirrel baffle, or a wire mesh cage around the entrance. These features help prevent unwanted access from squirrels, cats, or other predators.

Maintenance and Care

Regular maintenance is essential for ensuring the longevity and safety of your birdhouse:

  • Clean the birdhouse annually or more frequently if needed. Remove any nesting materials and debris to prevent the buildup of harmful parasites and diseases.
  • Inspect for damage. Repair any broken or cracked parts to maintain structural integrity and prevent leaks.
  • Repaint or stain as needed. Keep the exterior of the birdhouse looking fresh and protected.
  • Monitor bird activity. Observe the birdhouse for signs of distress or illness in the occupants.

Conclusion

Building a large birdhouse is a fulfilling project that can bring joy to both you and the feathered inhabitants of your backyard. By following these comprehensive guidelines, you can create a comfortable and safe haven for a variety of bird species. Remember to choose materials that are weather-resistant, design the birdhouse with the needs of the target birds in mind, and maintain it regularly for a long-lasting sanctuary. Enjoy the rewarding experience of observing birds raise their young in your handcrafted masterpiece.

Read More..
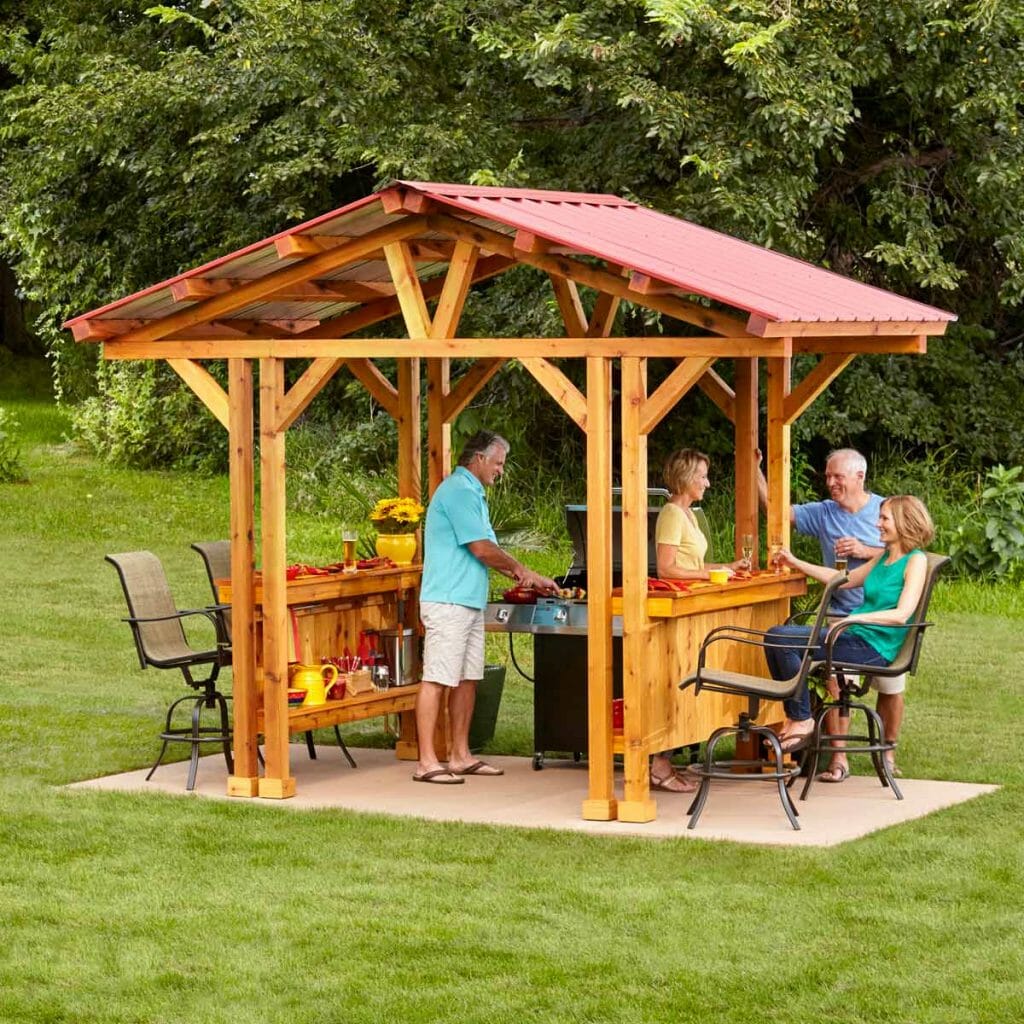
How to build a grill gazebo with a relaxing outdoor lounge

Build a Grill Gazebo with a Relaxing Outdoor Lounge

Imagine this: the aroma of grilling delights fills the air as you relax in a comfortable lounge, enjoying the company of friends and family. This idyllic scene is within your reach when you build a grill gazebo with a relaxing outdoor lounge. A grill gazebo offers a dedicated space for outdoor cooking and dining, protected from the elements and enhanced by a cozy lounge area. Let's embark on this exciting project together!

Planning Your Grill Gazebo and Lounge

Before you dive into construction, take some time to plan your grill gazebo and lounge. Consider the following:

Size and Location

Determine the size of your gazebo and lounge area based on your needs and the available space in your yard. Factor in the size of your grill, seating capacity, and desired walking space. Choose a location that provides shade, privacy, and easy access to utilities.

Materials

Select durable materials for your gazebo, like treated lumber, metal, or vinyl. Choose a roofing material that provides shade and protection from rain. For the lounge area, consider comfortable furniture like wicker chairs, a plush sofa, or a hammock.

Design and Style

Think about the overall aesthetic you want to achieve. Do you prefer a rustic, modern, or tropical vibe? Choose a design that complements your home and landscaping. Select furniture and accessories that align with your chosen style.

Building the Gazebo

Once your plan is set, it's time to build the gazebo. Here's a step-by-step guide:

Foundation

Lay a solid foundation for your gazebo using concrete piers or a wooden deck. Ensure it is level and strong enough to support the structure.

Frame

Construct the frame using treated lumber or metal posts. Secure the posts to the foundation and build a roof frame.

Roof

Install the roofing material of your choice, such as metal panels, shingles, or canvas. Ensure proper ventilation and drainage.

Walls

If you desire walls, install them using lattice panels, privacy screens, or curtains. Consider using insect netting for added protection.

Creating the Lounge Area

Once your gazebo is complete, create a comfortable lounge area. Here are some tips:

Furniture

Choose comfortable seating options that complement your gazebo's style. Add a coffee table for drinks and snacks.

Lighting

Install ambient lighting, like string lights or lanterns, to create a warm and inviting atmosphere.

Decor

Add personal touches like throw pillows, blankets, and plants to create a cozy and inviting space.

Enjoy Your Grill Gazebo and Lounge

After all your hard work, it's time to enjoy your grill gazebo and relaxing outdoor lounge. Invite friends and family over for a barbecue, enjoy a quiet evening with a good book, or simply relax and soak up the sunshine.

Your grill gazebo with a lounge area will become a favorite spot for outdoor living and entertaining. You've created an oasis where you can relax, cook delicious meals, and create lasting memories with loved ones.

Read More..
How to Design and Build a Custom Cold Frame

Designing and Building a Custom Cold Frame

A cold frame is a simple yet versatile structure that extends the growing season, allowing gardeners to start seeds early in the spring, protect tender plants during the fall, and even grow certain crops year-round in milder climates. By harnessing the power of the sun and trapping heat, a cold frame provides a controlled environment that promotes healthy plant growth.

While commercially available cold frames are readily available, building your own offers a unique opportunity to customize the design to perfectly suit your garden's needs and aesthetic preferences. This article will guide you through the process of designing and constructing a custom cold frame, covering everything from materials to construction techniques.

Design Considerations

Before diving into the construction, carefully consider these design elements to create a cold frame that best suits your requirements.

Size and Shape

The size of your cold frame will depend on your gardening goals. A small cold frame, around 3 feet by 4 feet, is suitable for starting seeds or protecting a few delicate plants. Larger cold frames, up to 6 feet by 8 feet, offer more space for growing a wider variety of vegetables or even housing overwintering plants.

The shape is mostly a matter of personal preference. Rectangular cold frames are the most common, offering ample space and ease of construction. However, you can also explore curved or even triangular designs for a more unique look.

Orientation

The orientation of your cold frame is crucial for maximizing sunlight exposure. Ideally, position your cold frame facing south to receive the maximum amount of sunlight throughout the day. If your space is limited, east or west orientation can also work well.

Material Selection

Choose materials that are durable, weather-resistant, and easy to work with. Common choices include:

  • Wood: Offers warmth, natural insulation, and ease of construction. Cedar, redwood, and pressure-treated lumber are good choices for durability.
  • Metal: Provides a sleek, modern look and is highly durable. Aluminum or galvanized steel are excellent choices for resisting rust.
  • Plastic: Lightweight, affordable, and easy to clean. PVC or polycarbonate panels are great options for covering the top of the cold frame.
  • Glass: Offers excellent light transmission but can be heavy and breakable. If you choose glass, ensure it's tempered for safety.

Ventilation

Proper ventilation is crucial for preventing excessive humidity and maintaining optimal temperature inside the cold frame. Consider incorporating ventilation features like:

  • Adjustable lids: Allow for precise control of airflow and temperature regulation.
  • Vents: Can be built into the sides or bottom of the cold frame to provide passive ventilation.
  • Automatic vents: Can be added to open and close based on temperature changes, ensuring optimal air circulation.

Insulation

Insulation is particularly important during colder months to maintain optimal temperatures. Consider adding:

  • Styrofoam: Affordable and readily available, providing excellent thermal insulation.
  • Fiberglass insulation: Offers a higher level of insulation but can be more expensive.
  • Wool batting: Natural, breathable, and sustainable, offering good thermal insulation.

Construction Process

Once you have your design finalized, you can start assembling your cold frame. Here's a step-by-step guide:

1. Prepare the Site

Select a level and sunny spot for your cold frame. Clear the area of any debris and weeds. If necessary, prepare the soil by adding compost or other amendments to improve drainage and fertility.

2. Build the Frame

Cut and assemble the frame using your chosen material. For a wooden frame, use screws, nails, or joinery techniques to create a sturdy and stable structure. Ensure the corners are square and the frame is level before proceeding.

3. Attach the Base

Attach the base of your cold frame to the frame. For a wooden base, use treated lumber to resist rot and moisture damage. Secure the base to the frame using screws or nails. Ensure the base is level and flush with the ground. If using a metal frame, you might consider a metal base for a uniform look.

4. Install the Cover

Choose a cover that allows maximum light transmission while providing adequate protection from the elements. Glass, polycarbonate, or even recycled plastic sheeting are good options. Attach the cover to the frame using hinges, clips, or a sliding mechanism. Make sure the cover sits securely and opens easily for access and ventilation.

5. Add Ventilation

Incorporate ventilation features to regulate temperature and humidity inside the cold frame. This could involve installing adjustable lids, vents, or automatic vent systems.

6. Apply Insulation (Optional)

If you plan to use your cold frame during colder months, consider adding insulation. This is particularly important if you live in a region with harsh winters. Install the insulation material between the walls and the cover.

7. Finish the Project

Once your cold frame is assembled, add any finishing touches, like painting the wood or adding a sealant to protect the materials. To enhance aesthetics and functionality, consider building a small shelf inside the cold frame to hold seeds, tools, or other items.

Maintenance and Care

To ensure your cold frame functions optimally and lasts for years to come, follow these maintenance tips:

  • Regularly clean the glass or plastic cover to maximize sunlight penetration and prevent dirt buildup.
  • Inspect the frame and cover for damage and make repairs promptly to prevent leaks or structural weaknesses.
  • Ventilate the cold frame regularly to prevent excessive humidity and mold growth.
  • Monitor temperatures inside the cold frame and adjust ventilation accordingly to maintain optimal growing conditions.
  • Remove debris and weeds from the cold frame and surrounding area to maintain a clean and healthy environment for your plants.

Building a custom cold frame is a rewarding project that allows you to extend your growing season and enjoy fresh produce even during colder months. By following these design and construction guidelines, you can create a durable, functional, and aesthetically pleasing cold frame that will enhance your gardening experience for years to come.

Read More..
Squirrel Den Box Designs for Any Skill Level

Squirrel Den Box Designs for Any Skill Level

Embrace the delightful world of backyard wildlife by building a cozy squirrel den box. These charming structures offer a safe haven for these furry acrobats, enriching your outdoor space with playful activity. From simple designs for beginners to intricate models for seasoned builders, there's a perfect squirrel den box waiting to be crafted. Let's embark on this enriching journey, transforming your yard into a squirrel paradise!

Beginner-Friendly Squirrel Den Boxes

Start your squirrel den box journey with a simple and accessible design. These projects are ideal for those new to woodworking or eager to try their hand at a fun and rewarding craft. Choose a basic box design, focusing on creating a safe and comfortable space for the squirrels.

Wooden Box With an Entrance Hole

This straightforward design involves creating a simple wooden box with a carefully measured entrance hole. Select sturdy plywood or cedar for durability, and measure the box dimensions to ensure a comfortable fit for the squirrels.

  • Choose a box size that’s at least 12" x 12" x 12".
  • Cut a circular entrance hole with a diameter of approximately 4-5 inches, ensuring it's positioned high on one side of the box.
  • Create a roof with a slight overhang for protection from the elements.
  • Recycled Container Den Box

    Embrace a sustainable approach by repurposing a sturdy container as a squirrel den box. This eco-friendly option not only utilizes recycled materials but also adds a unique touch to your backyard.

    • Clean and prepare a plastic or metal container, ensuring it's free of sharp edges or hazardous materials.
    • Cut a circular entrance hole on one side, adjusting the size based on the container’s dimensions.
    • Secure the lid or create a roof for weather protection.
    • Intermediate-Level Squirrel Den Boxes

      Venture into more intricate designs, adding embellishments and extra features to create a truly enchanting squirrel haven. These intermediate-level projects offer a challenge while allowing you to express your creativity and woodworking skills.

      Double-Chambered Squirrel Den Box

      Elevate your design with a double-chambered squirrel den box, providing additional space and privacy for the squirrels. This design incorporates two separate chambers, each with its own entrance hole.

      • Utilize sturdy wood like cedar or pine for the box's frame.
      • Create two distinct chambers, each measuring about 12" x 12" x 12".
      • Position the entrance holes on opposite sides of the box, allowing for easy access and separation between the chambers.
      • Squirrel Den Box with a Viewing Window

        Experience the joy of observing squirrels in their natural habitat with a den box featuring a viewing window. This design provides a safe and unobstructed glimpse into the squirrels' world, fostering a sense of connection with these charming creatures.

        • Choose a clear plastic or acrylic sheet for the window, ensuring it's strong enough to withstand the elements.
        • Cut a rectangular opening on the side of the box, fitting the window securely in place.
        • Position the window strategically for a clear view of the interior, allowing you to observe the squirrels without disturbing their privacy.
        • Advanced Squirrel Den Box Designs

          Challenge yourself with advanced squirrel den box designs, incorporating intricate woodworking techniques and functional elements. These projects demonstrate your woodworking expertise and create an exceptional habitat for your furry friends.

          Multi-Level Squirrel Den Box

          Expand your design skills with a multi-level squirrel den box, offering increased living space and opportunities for exploration. This project requires careful planning and execution, ensuring a secure and functional structure.

          • Utilize durable and weather-resistant wood for the box's frame.
          • Construct multiple levels, each providing a separate sleeping or nesting area.
          • Connect the levels with ramps or ladders, allowing squirrels to move freely between them.
          • Squirrel Den Box with a Feeding Platform

            Create a complete squirrel sanctuary with a den box incorporating a feeding platform. This all-in-one design provides both shelter and sustenance, encouraging squirrels to frequent your backyard.

            • Attach a sturdy platform to the front of the den box, ensuring it's accessible to the squirrels.
            • Position the platform to provide a clear view of the surroundings, allowing squirrels to feel safe while feeding.
            • Create a small railing around the platform to prevent squirrels from falling.
            • Tips for Attracting Squirrels to Your Den Box

              Once your squirrel den box is complete, there are several steps you can take to entice these playful creatures to make it their home. Consider these simple tips to maximize your chances of welcoming a furry resident:

              • Location is Key: Position the den box in a shaded and protected location, preferably near a tree or dense foliage. Avoid placing it in direct sunlight or areas exposed to strong winds.
              • Consider Height: Mount the den box at least 6-8 feet above ground, allowing squirrels to access it safely and reducing the risk of predators.
              • Make it Inviting: Line the interior with soft bedding material such as shredded newspaper or straw, providing a comfortable nesting space.
              • Offer Treats: Scatter seeds, nuts, or fruits near the den box to attract squirrels and introduce them to their new sanctuary.
              • Building a squirrel den box is a rewarding and fulfilling experience. Whether you're a beginner or an experienced woodworker, these designs offer a range of options to suit your skill level and creativity. Enjoy the process of crafting a cozy haven for these delightful creatures, adding a touch of wild charm to your backyard!

Read More..
How to Build a Birdhouse with a Movable Side for Easy Cleaning

Building a Birdhouse with a Movable Side for Easy Cleaning: A Step-by-Step Guide

Hey there, bird lovers! Are you ready to give our feathered friends a cozy place to call home? Building a birdhouse is a fun and rewarding project, and it's a great way to attract birds to your backyard. But let's be honest, cleaning those tiny houses can be a real chore! That's why I'm sharing my secret weapon: a birdhouse with a movable side for easy cleaning. It's like having a secret door to the birdhouse's inner sanctum! Let's get building!

Materials You'll Need:

Before you start, gather all your materials. Don't worry, this is just a basic list. You can always adjust the size and design to your liking.

  • Wood (1x6 inch boards are a good choice for the base and sides)
  • Wood glue
  • Wood screws (1 1/2 inch)
  • Saw (circular saw or hand saw)
  • Drill
  • Measuring tape
  • Pencil
  • Screwdriver or drill bit
  • Sandpaper
  • Paint or stain (optional)
  • Hinges (2)
  • Latch or hook (optional)

Let's Get Building!

Step 1: Cut the Wood

It's time to unleash your inner carpenter! Use your saw to cut the wood to the following dimensions:

  • Base: 1x6 inch board, cut to the desired length (about 6-8 inches). This will be the bottom of your birdhouse.
  • Back and Front Walls: Two 1x6 inch boards, cut to the desired height (about 6-8 inches). These will be the back and front of your birdhouse.
  • Sides: Two 1x6 inch boards, cut to the desired width (about 4-6 inches). These will be the sides of your birdhouse. We'll be making one of these sides movable, so let's call them side A and side B.
  • Roof: One 1x6 inch board, cut to the desired length (slightly longer than the base). We'll be creating a simple gable roof, so we need to cut this board at a slight angle.
  • Entrance Hole: You'll need to cut a circular entrance hole on the front wall. The size of the hole will depend on the type of birds you want to attract. Research the birds you're hoping to see in your area to find the right size.

Step 2: Assemble the Base

Now it's time to put the birdhouse together! Start by attaching the two side boards to the base. Use wood glue and wood screws to secure them in place. Make sure the sides are flush with the edges of the base.

Next, attach the back wall to the base using wood glue and wood screws. Remember to leave a gap at the top for the roof.

Step 3: Create the Movable Side

This is the magic step! We're going to turn one of the side boards into a handy cleaning door!

Take the side board marked side B, and carefully cut it into two sections. The top section should be about 2/3 of the board's total length. The bottom section will be the movable side of your birdhouse. You can adjust these lengths depending on your preference.

Now, take the top section of side B and attach it to the other side (side A) using wood glue and wood screws. Make sure the seam is flush and smooth.

Finally, take the bottom section (the movable side) and attach it to the base using hinges. These hinges will allow the side to swing open and shut. Attach the hinges to the side board first, then to the base. Make sure the hinges are positioned at the top and bottom of the movable side, so that it can swing open smoothly.

Step 4: Add the Roof

Time to give your birdhouse a roof!

Take the roof board, and use a saw to cut two angles on the edges. These angled cuts will create a sloping roof. The angles should be symmetrical, and the slope should be gradual.

Once the roof is cut, attach it to the back and front walls of the birdhouse using wood glue and wood screws.

Step 5: Add the Entrance Hole

Now, let's create the entrance hole for your feathery friends.

Use your pencil to trace out the desired size and shape of the hole on the front wall. You can use a drill bit and a circular saw, or a jigsaw to cut the hole.

Step 6: Finishing Touches

You're almost there! It's time to give your birdhouse some finishing touches.

  • Sanding: Sand down any rough edges and surfaces with sandpaper to create a smooth finish. This will make the birdhouse more comfortable for the birds and will also help to prevent splinters.
  • Paint or Stain: If you want, paint or stain the birdhouse to give it a unique look. Choose colors that blend in with your surroundings or that will make your birdhouse stand out. Remember to let the paint or stain dry completely before you install the birdhouse.
  • Latch or Hook: To keep the movable side closed, consider adding a latch or hook. This will help to keep the birds inside and will also help to keep the movable side from swinging open in windy conditions.

Tips for Attracting Birds

Okay, you've built an amazing birdhouse, but how do you attract those little feathered friends? Here are a few tips to make your birdhouse a welcoming home:

  • Location is Key: Choose a spot for your birdhouse that is sheltered from wind and rain. The birdhouse should also be placed in an area where it is visible to the birds, but away from busy areas with lots of foot traffic.
  • Provide Food and Water: Birds need food and water to survive. Consider adding a bird feeder or a bird bath to your yard.
  • Choose the Right Birdhouse: Make sure the birdhouse you choose is the right size and shape for the birds you want to attract. For example, a smaller birdhouse is better suited for chickadees and wrens, while a larger birdhouse is better suited for bluebirds or woodpeckers.
  • Be Patient: Don't be discouraged if it takes some time for birds to find your birdhouse. It may take a few weeks or even months for birds to become comfortable in a new area. Just keep providing food and water, and eventually, your birdhouse will become a popular spot for feathered friends.

Enjoy Your New Birdhouse!

Congratulations! You've created a birdhouse with a movable side that's both functional and stylish. Now you can enjoy the beauty of birds visiting your yard, without the hassle of cleaning a messy birdhouse.

Remember, this is just a basic guide. Feel free to experiment with different designs, colors, and features. The possibilities are endless!

Happy birding!

Read More..
Grill gazebo diy: how to use natural materials for a rustic look

Grill Gazebo DIY: Natural Materials for a Rustic Look

Imagine this: a warm summer evening, the scent of grilling food fills the air, and you're relaxing under a charming, rustic gazebo. Sounds pretty idyllic, right? Well, you can make that dream a reality with a little DIY know-how and a love for natural materials. Building a grill gazebo from scratch is a rewarding project that lets you customize your outdoor space and create a unique haven for your culinary adventures.

Let's dive into the world of rustic grill gazebos and explore how to use natural materials to achieve that cozy, inviting vibe. From choosing the perfect wood to incorporating sustainable accents, this guide will help you build a gazebo that's as beautiful as it is functional.

Choosing the Right Wood for Your Rustic Vibe

The foundation of your rustic gazebo is the wood you choose. Opting for natural, weathered materials will instantly enhance the rustic aesthetic you're aiming for. Here are some popular choices that will stand the test of time:

Cedar

Cedar is a classic choice for outdoor structures. Its natural resistance to rot and insects makes it an excellent option for longevity. It also boasts a beautiful reddish-brown hue that will deepen over time, adding character to your gazebo.

Redwood

Another durable wood, redwood is prized for its rich color and natural resistance to moisture. It's a bit more expensive than cedar, but its beauty and longevity make it a worthwhile investment.

Reclaimed Wood

If you're looking for a truly unique and sustainable approach, consider using reclaimed wood. Old barn wood, salvaged timbers, or even repurposed pallets can be transformed into stunning accents for your gazebo. The knots, imperfections, and weathered textures of reclaimed wood add an irresistible touch of history and character.

Pressure-Treated Lumber

For the base and structural components of your gazebo, consider pressure-treated lumber. It's designed to withstand moisture and decay, ensuring your structure remains strong and sturdy. While it might not have the same natural beauty as other options, you can paint or stain it to blend seamlessly with the rest of your design.

Designing a Rustic Grill Gazebo

Now that you've selected your wood, it's time to get creative with the design. The beauty of a DIY project is that you can customize it to perfectly complement your backyard and style preferences. Here are some design elements that will amplify the rustic charm:

A-Frame Roof

A classic A-frame roof is a simple and visually appealing choice that embodies the rustic aesthetic. It's easy to construct and provides ample overhead coverage.

Gable Roof

For a slightly more elaborate design, consider a gable roof. This option offers more headroom and allows for a more spacious interior feel.

Open Sides

To maximize airflow and create a sense of openness, leave the sides of the gazebo open. You can add lattice panels or curtains for privacy and shade when needed.

Rustic Details

Amplify the rustic feel with thoughtful details. Here are some ideas:

  • Exposed beams: Leave the beams on the ceiling and walls exposed for a rustic and authentic look.
  • Rustic lighting: Consider using Edison bulbs, lanterns, or string lights to add warm and inviting ambiance.
  • Stone or brick accents: Incorporate stone or brick elements for a touch of natural beauty and durability.
  • Wrought iron accents: Add a touch of elegance and strength with wrought iron accents for details like gates, supports, or hooks.

Building Your Rustic Grill Gazebo

Now that you have a clear vision, let's get down to building your dream grill gazebo. Here's a simplified step-by-step guide to get you started:

1. Plan and Prep

Before you break out the tools, it's crucial to plan everything out. Draw a detailed sketch of your gazebo, including dimensions, materials, and desired features. This will ensure you have all the necessary materials on hand and can accurately estimate the time and effort involved.

2. Prepare the Foundation

A sturdy foundation is essential for a long-lasting gazebo. Consider these options:

  • Concrete slab: Offers the most stability but can be more labor-intensive.
  • Poured concrete piers: A good compromise between stability and ease of construction.
  • Wooden posts embedded in the ground: Suitable for lighter gazebos on well-drained soil.

3. Build the Frame

The gazebo's frame is the heart of the structure. Using your design and materials, assemble the main posts, beams, and rafters. Ensure everything is securely joined with appropriate screws, bolts, or brackets. Remember to check for squareness and levelness throughout the process.

4. Construct the Roof

Depending on your chosen roof style, carefully assemble and attach the roof panels or shingles. Use weatherproof adhesives and fasteners to ensure a tight, leak-proof seal. Consider adding roof vents for better airflow and to prevent moisture build-up.

5. Add the Finishing Touches

Now comes the fun part: the finishing touches. Apply a stain or paint to enhance the wood's natural beauty and protect it from the elements. Install lattice panels, curtains, lighting, and any other desired features to bring your rustic vision to life.

Incorporating Sustainable Accents

Building a rustic grill gazebo doesn't have to be a purely aesthetic endeavor. You can also incorporate sustainable elements to make your project environmentally conscious.

  • Solar lighting: Use solar-powered lights to illuminate your gazebo without relying on electricity.
  • Recycled materials: Look for recycled materials like glass bottles, repurposed wood, or metal scraps to create unique and eco-friendly accents.
  • Native plants: Choose native plants for landscaping around your gazebo, promoting biodiversity and reducing the need for water-intensive plants.

Enjoy Your Rustic Retreat

And there you have it! With a little planning, effort, and a passion for natural materials, you can create a stunning rustic grill gazebo that will become the heart of your outdoor gatherings. As you enjoy the fruits of your labor, remember that the best part of a DIY project is the satisfaction of building something beautiful and functional with your own hands. So grab your tools, embrace the rustic charm, and let the grilling adventures begin!

Read More..