Tuesday, November 12, 2024

How to Build a Birdhouse for Winter Use with Extra Insulation

Building a Birdhouse for Winter Use with Extra Insulation

Providing birds with a safe and cozy shelter during the harsh winter months can be immensely rewarding. A well-built birdhouse with extra insulation can offer them much-needed protection from the elements, encouraging them to stay in your yard and providing you with captivating birdwatching opportunities. This article will guide you through the process of constructing a birdhouse specifically designed for winter use, incorporating insulation techniques to maximize its warmth and comfort for your feathered friends.

Choosing the Right Birdhouse Design

The first step in building a winter-ready birdhouse is selecting the appropriate design. Consider the following factors:

Bird Species

Different bird species prefer different types of nesting cavities. Research the species you wish to attract and choose a design that matches their preferred dimensions. For instance, chickadees and nuthatches favor smaller houses with a 1.25-inch entrance hole, while downy woodpeckers prefer slightly larger openings.

Material Selection

Wood is the most common and recommended material for birdhouses. Cedar and redwood are naturally resistant to decay and insects, making them ideal choices. Avoid using pressure-treated lumber, as the chemicals used can be harmful to birds.

Orientation

To maximize warmth, orient the birdhouse facing south or southeast, allowing the sun to penetrate the cavity. This will help to naturally heat the interior during the day. Additionally, ensure the entrance hole is positioned on the side, shielding birds from prevailing winds.

Constructing the Birdhouse

Once you have chosen your design, follow these steps to build a sturdy and insulated birdhouse:

Cutting and Assembling the Parts

  • Cut the wooden boards to the desired dimensions using a saw. Ensure all cuts are precise for a tight and well-fitting structure.
  • Use wood glue and screws to assemble the base, sides, and roof of the birdhouse. For added stability, reinforce corners with additional screws or brads.
  • Create a perch for the birds by attaching a small piece of wood to the front of the house. Position it just below the entrance hole, making it accessible for birds to land.
  • Cut the entrance hole with a jigsaw or drill. Ensure the size is appropriate for the target bird species.
  • For a traditional look, add a decorative roof overhang using additional pieces of wood. This will help to protect the entrance hole from rain and snow.
  • Adding Insulation

    Insulating the birdhouse is crucial for winter use, as it will help to maintain a comfortable temperature inside. Here are several options:

    Insulation Materials

  • Sheep's wool: This natural material is highly effective and provides excellent thermal insulation. It is also safe for birds.
  • Cotton batting: A readily available and affordable option, cotton batting offers good insulation properties. However, ensure it is not treated with fire retardants, as these can be harmful to birds.
  • Recycled newspaper: Shredded newspaper can be an excellent and eco-friendly insulating material. It is important to use newspaper that is free from ink and dyes that could be harmful to birds.
  • Foam board: Lightweight and readily available, foam board can be cut to fit the inside of the birdhouse, providing a barrier against cold air.
  • Insulation Techniques

  • Stuffing the interior: This method involves filling the cavity of the birdhouse with your chosen insulating material. Pack it tightly, leaving enough space for the nesting materials the birds may bring in.
  • Creating a lining: Cut pieces of insulation to fit the walls of the birdhouse. Glue or staple them in place to create a snug lining. Leave the entrance hole open to allow birds to enter.
  • Combining methods: You can combine different insulation methods for maximum warmth. For instance, use a foam board lining and stuff the remaining cavity with sheep's wool.
  • Finishing Touches

  • Painting: Apply a coat of weatherproof paint to the exterior of the birdhouse. Avoid using bright or vibrant colors, as these may be intimidating to birds. Neutral colors like brown, green, or gray are best. Avoid using paint that contains harmful chemicals.
  • Ventilation: Add a small ventilation hole at the top of the roof to allow for air circulation. This will help to prevent moisture build-up inside the house.
  • Mounting: Choose a location for your birdhouse that is sheltered from the wind and rain. Mount it securely to a tree, post, or wall at a height of 5-10 feet from the ground. Avoid placing it near windows, as birds may collide with the glass.
  • Maintaining Your Winter Birdhouse

    Once your birdhouse is built and installed, it is essential to provide regular maintenance to ensure it remains in good condition and continues to provide a safe and cozy haven for birds.

    Cleaning

    Clean the birdhouse in the spring after the nesting season. Remove any old nesting material and wipe down the interior with a mild disinfectant solution. This will help to prevent the buildup of parasites and diseases.

    Monitoring

    Regularly monitor the birdhouse for any signs of damage or deterioration. Repair or replace any broken parts promptly. Ensure the insulation remains in good condition and replace it if it becomes compressed or damp.

    Providing Food and Water

    To attract birds to your birdhouse, provide them with a reliable source of food and water throughout the winter. Offer a variety of seeds, suet, and nuts in feeders located near the birdhouse. Also, provide a shallow dish of fresh water, as birds may not find natural sources in frozen conditions.

    Conclusion

    By following these guidelines, you can build a welcoming and well-insulated birdhouse that will provide birds with a safe and comfortable refuge during the winter months. Your efforts will not only benefit the birds, but also enrich your own life by providing you with the joy of observing these fascinating creatures up close in your own backyard.
    Read More..
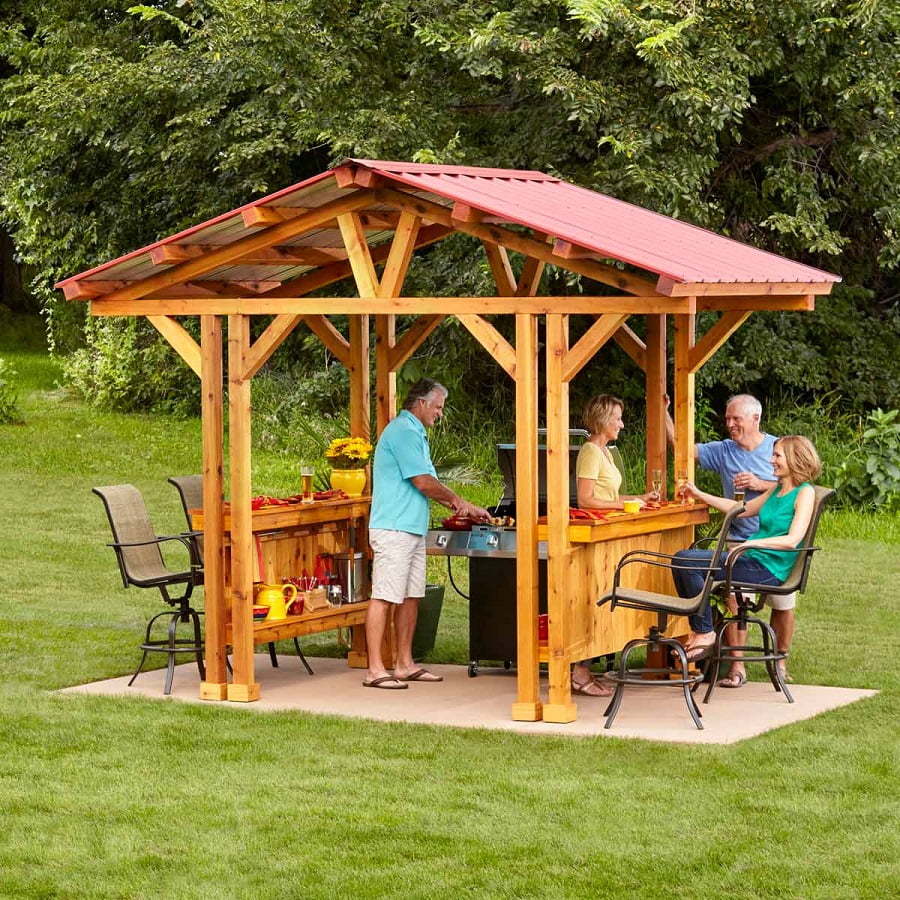
    How to build a grill gazebo with movable sections

    Building a Grill Gazebo with Movable Sections: A Step-by-Step Guide

    So you're looking to build a grill gazebo, but you want something more versatile than a traditional fixed structure. Something that can adapt to your needs and weather conditions. You're in luck! A gazebo with movable sections is the perfect solution. It's not just about functionality, but also about the flexibility to customize your outdoor grilling space to your liking.

    This guide will walk you through the process of building a grill gazebo with movable sections. You'll learn how to plan, design, and construct your own personalized outdoor grilling haven.

    Planning and Design

    The first step is to dream big! Picture your ideal grill gazebo. Think about how you want to use it, what features you want, and how you want it to look. The more detailed your vision, the better your design will be.

    1. Determine the Size and Layout

    Think about the size of your grill and how much space you need to move around comfortably. Consider the size of your patio or yard and the surrounding structures. You don't want your gazebo to feel cramped or overwhelming.

    Imagine the flow of your grilling area. Where will your grill go? Do you want seating inside the gazebo or just outside? Will you have a serving area or a prep space?

    2. Choose Your Materials

    There are many materials you can use for your grill gazebo. Here are some popular options:

    • Wood: Wood is a classic choice for outdoor structures. It's relatively inexpensive and easy to work with. Consider using pressure-treated lumber for better durability against moisture and insects.
    • Metal: Metal is a more durable and weather-resistant option than wood. Aluminum and steel are common choices, but they can be more expensive.
    • PVC: PVC is a lightweight and low-maintenance option. It's also very resistant to moisture and corrosion. However, it may not be as aesthetically pleasing as wood or metal.

    3. Design the Movable Sections

    Now comes the fun part â€" creating those movable sections! Think about how you want to be able to configure your gazebo. Here are some ideas:

    • Folding Panels: Panels can be hinged at the bottom or top and fold like an accordion, offering different degrees of openness.
    • Sliding Panels: Similar to sliding doors, panels can slide along tracks for a smooth and easy opening mechanism.
    • Removable Panels: These are the simplest option â€" panels can be easily removed or attached to the frame. They're great for creating a completely open space.

    4. Consider the Roof

    Will your gazebo be open-air or covered? A solid roof provides shade and protection from the elements, while a retractable awning or canopy offers greater flexibility.

    Think about the materials for your roof:

    • Metal roofing: A durable and long-lasting option, often used for a modern look.
    • Shingles: A classic and affordable option that can be used for a traditional look.
    • Fabric canopy: For a lightweight and versatile option, perfect for creating shade on sunny days.

    Construction

    Once you have your plan and design, it's time to get to work! Building a grill gazebo with movable sections requires a bit more effort than a standard gazebo, but the result is well worth it. Here's a step-by-step guide:

    1. Laying the Foundation

    A solid foundation is essential for any structure. Consider these options:

    • Concrete pads: The most durable and stable option. They're ideal for heavy structures and long-term use.
    • Pressure-treated wooden posts: A more affordable option, but they may require regular maintenance.
    • Metal posts: Durable and low-maintenance, but can be more expensive.

    2. Building the Frame

    Start by constructing the main frame of your gazebo. This will provide the support for the roof and walls.

    • Use strong, durable materials: Pressure-treated lumber, metal beams, or PVC pipes are excellent choices.
    • Securely fasten the frame: Use screws, bolts, or metal brackets for long-lasting strength.
    • Ensure the frame is level and square: Use a level and measuring tape to ensure the frame is properly aligned.

    3. Creating the Movable Sections

    Now comes the unique part of this project: creating the movable sections. Here are some tips:

    • Choose the right type of hinges or sliding mechanisms: Ensure they are strong enough to support the weight of the panels.
    • Make sure the panels fit snugly in their slots: This will prevent drafts and weather from getting in.
    • Use weather-resistant materials for the panels: Consider using wood that's been treated for moisture resistance, metal panels, or PVC.

    4. Adding the Roof

    Once the frame is complete, you can add the roof. The method will depend on your chosen materials and design.

    • For metal roofing, attach the sheets to the frame with screws and flashing.
    • For shingles, follow the manufacturer's instructions for installation.
    • For fabric canopies, install the canopy frame and stretch the fabric over it.

    5. Adding Finishing Touches

    Now it's time to personalize your grill gazebo! You can add these touches to create a truly unique space:

    • Install lighting: Add string lights, lanterns, or overhead lights for ambiance.
    • Include seating: Add a comfortable sofa, chairs, or bar stools.
    • Create a storage area: Build shelves or cabinets for your grilling tools and supplies.
    • Add decorative features: Plant flowers around the base of your gazebo, hang wind chimes, or add other personal touches.

    Conclusion

    Building a grill gazebo with movable sections is a great way to add versatility and style to your outdoor grilling area. With careful planning, design, and construction, you can create a personalized space that you'll enjoy for years to come.

    Don't be afraid to get creative and let your imagination run wild. Remember, your grill gazebo is an extension of your home, so make it reflect your unique style and personality. And most importantly, enjoy the process!

    Read More..
    How to craft a farmhouse desk with simple woodworking skills

    Crafting a Farmhouse Desk with Simple Woodworking Skills

    A farmhouse desk is a versatile piece of furniture that can bring a touch of rustic charm to any home office, bedroom, or living space. With its simple design and enduring appeal, a farmhouse desk is a perfect project for woodworkers of all levels, even beginners. This guide will walk you through the process of crafting a farmhouse desk from scratch, using basic woodworking skills and readily available materials.

    Planning Your Farmhouse Desk

    Before you start cutting wood, take some time to plan your project. This includes determining the size and style of your desk, choosing the right materials, and gathering the necessary tools.

    Choosing the Right Size

    The size of your farmhouse desk will depend on your space and needs. Consider the following:

    • Available space: Measure the area where you plan to place the desk to ensure it fits comfortably.
    • Desk usage: Will you be using the desk for work, studying, or casual activities?
    • Storage needs: Do you need drawers or shelves for storage?

    Selecting Materials

    For a farmhouse desk, you can use a variety of wood types. Popular choices include:

    • Pine: Affordable, lightweight, and easy to work with.
    • Oak: Durable, strong, and adds a touch of elegance.
    • Reclaimed wood: Adds character and sustainability to your desk.

    Consider the following factors when choosing your wood:

    • Budget: Some wood types are more expensive than others.
    • Appearance: Different wood types have unique grain patterns and colors.
    • Availability: Check with your local lumberyard for the availability of your chosen wood type.

    Gathering Tools and Supplies

    For this project, you'll need the following tools and supplies:

    • Circular saw or table saw
    • Miter saw
    • Drill
    • Screwdriver
    • Sandpaper
    • Clamps
    • Wood glue
    • Wood screws
    • Finishing nails
    • Wood stain or paint
    • Finishing oil or wax (optional)
    • Measuring tape
    • Pencil
    • Safety glasses and hearing protection

    Constructing the Desk

    Once you have gathered your materials and tools, you can begin constructing the desk. This involves cutting the wood to size, assembling the frame, and adding the top.

    Cutting the Wood

    Start by cutting the wood pieces to the dimensions specified in your design. Use your circular saw or table saw for straight cuts, and your miter saw for angled cuts.

    Assembling the Frame

    The frame of your farmhouse desk will typically consist of two long rails (also known as stretchers) for the legs and four legs. Assemble the frame by joining the rails to the legs using wood glue and screws. Ensure that the frame is square and that the legs are all at the same height.

    Adding the Top

    Once the frame is assembled, you can add the top. For a farmhouse desk, the top is typically a single piece of wood. Secure the top to the frame with wood glue and screws. Make sure the top is flush with the frame and that the screws are countersunk to avoid any potential snags.

    Finishing the Desk

    After the desk is assembled, it's time to finish it. This includes sanding, staining or painting, and applying a sealant.

    Sanding

    Sand the desk thoroughly with sandpaper, starting with a coarse grit and working your way to a fine grit. This will smooth out any rough edges and prepare the surface for staining or painting.

    Staining or Painting

    You can choose to stain or paint your farmhouse desk, depending on your desired aesthetic.

    • Staining: Staining will enhance the natural beauty of the wood while providing a protective finish. Apply the stain evenly with a brush or rag, following the manufacturer's instructions.
    • Painting: Painting will allow you to create a more vibrant and unique look. Choose a paint color that complements your decor. Apply two coats of paint for optimal coverage.

    Applying a Sealant

    After staining or painting, you can apply a sealant to protect your desk from spills and scratches. Common sealants include:

    • Polyurethane: Provides a durable and waterproof finish.
    • Wax: Offers a natural and subtle finish.
    • Oil: Penetrates the wood, providing a protective and water-resistant finish.

    Follow the manufacturer's instructions for applying the sealant. You can apply multiple coats for added protection.

    Adding Finishing Touches

    To further enhance the farmhouse style of your desk, consider adding these finishing touches:

    • Hardware: Choose rustic-style handles or knobs for any drawers or cabinets.
    • Distressing: Create a vintage look by distressing the paint or stain using sandpaper or a wire brush.
    • Decorative accents: Add decorative accents like metal brackets, rustic hooks, or wrought iron details to enhance the farmhouse charm of your desk.

    Conclusion

    Crafting a farmhouse desk is a rewarding woodworking project that allows you to personalize your home office or workspace. By following these simple steps and using readily available materials, you can create a durable and stylish desk that will last for years to come.

    Read More..
    Build a custom magic box: woodworking design ideas

    Building a Custom Magic Box: Woodworking Design Ideas

    A magic box isn’t just a container; it’s a portal to wonder, an object that sparks imagination and holds the promise of the extraordinary. Whether you're a seasoned woodworker or a curious beginner, building your own custom magic box offers a rewarding challenge. This article dives into a world of woodworking design ideas, inspiring you to create your own unique and captivating treasure.

    The Heart of the Box: Form and Function

    Before you grab your tools, consider the purpose of your magic box. Will it hold trinkets, serve as a secret compartment, or perhaps house a miniature stage for a magical performance? The function dictates the form, so envision its potential use.

    Classic Designs with a Twist

    Traditional shapes like cubes, cylinders, and chests provide a solid foundation for your magic box. These classic forms can be enhanced with decorative elements, intricate carvings, or hidden compartments that add a touch of magic. For example, a seemingly simple wooden cube could conceal a secret drawer, accessed through a hidden latch.

    Beyond the Ordinary: Exploring Unique Shapes

    Unleash your creativity and venture beyond the predictable. Imagine a box shaped like a crescent moon, a whimsical mushroom, or a fantastical creature. Embrace unexpected angles, curves, and textures to create a truly unique design.

    Materials: Choosing the Perfect Woods

    The magic box’s material plays a crucial role in its character. Explore different wood types, each possessing its own unique qualities and aesthetic appeal.

    Classic Choices for Timeless Charm

    • Oak: Renowned for its strength, durability, and rich grain patterns, oak exudes a sense of history and tradition.
    • Cherry: With its warm reddish hue and captivating grain, cherry adds a touch of elegance and sophistication.
    • Walnut: Known for its striking dark brown color and stunning grain patterns, walnut embodies a sense of luxury and refinement.

    Exploring Less-Traditional Options

    • Mahogany: This exotic wood boasts deep reddish-brown tones and a luxurious feel, adding a touch of exotic charm.
    • Cedar: Renowned for its aromatic scent and natural insect-repellent properties, cedar offers a unique sensorial experience.
    • Bamboo: A sustainable and lightweight material, bamboo lends a touch of natural beauty and a distinctive texture.

    Enhancing the Magic: Decorative Elements

    The details transform a mere box into a captivating piece of art.

    Carving and Intricacy

    Intricate carvings can tell stories, depict symbols of magic, or simply enhance the visual appeal of your box. From delicate floral motifs to mystical creatures, your carving skills can add a layer of depth and wonder.

    Inlays and Mosaics

    Inlays and mosaics crafted from contrasting wood species, precious metals, or even colorful stones can create mesmerizing patterns and visual illusions. A subtle inlay of mother-of-pearl or a mosaic of colorful hardwoods can elevate your design to new heights.

    Finishing Touches

    The finishing touches play a vital role in creating the final magical aura. Explore different stains, paints, and varnishes to enhance the wood’s natural beauty, create unique textures, or add a hint of whimsy.

    A Journey of Creation

    Building a custom magic box is more than just a woodworking project; it's a journey of creativity and discovery. Let your imagination soar, embrace the challenges, and revel in the joy of crafting something truly unique and magical.

    Read More..
    Crafting a compact desk with woodworking skills for small spaces

    Building a Tiny Desk That’s Big on Style: A DIY Guide for Small Spaces

    Hey there, fellow space-challenged friends! Let's face it, finding room for everything in a tiny apartment can feel like a constant game of Tetris. But fret not! We're about to tackle a project that'll give you a stylish and functional desk without hogging all that precious square footage. We're talking about crafting a compact desk masterpiece, all with the magic of woodworking. Ready to turn a few boards into the perfect workspace for your small space? Let's get started!

    Planning Your Mini Workspace Wonder

    Before we dive into the sawdust, let's map out your desk dream. The first step is deciding what kind of desk you need. Do you want a floating desk to maximize floor space, a classic L-shaped desk, or maybe something unique like a wall-mounted fold-down desk? Get inspired by online images, sketch out ideas, and consider the specific needs of your tiny haven.

    Defining the Dimensions

    Think about what you'll be doing at your desk. Will it be mainly for writing, computer work, or maybe a mix of both? Measure the area where you want to place your desk and sketch a rough outline. Don't forget to leave some breathing room around the desk for walking and opening drawers. The beauty of a DIY desk is that you can customize the size to fit your space perfectly.

    Picking Your Perfect Wood

    Choosing the right wood is like picking the right outfitâ€"it sets the tone! Plywood is a reliable and affordable option, offering a sleek, modern look. Solid hardwoods like oak, maple, or cherry provide a more traditional and sturdy vibe. If you’re feeling adventurous, try using reclaimed wood for a unique, eco-friendly touch.

    Essential Supplies for Your Desk-Building Adventure

    To whip up this desk magic, you'll need a few key tools:

    • A Saw: A circular saw, jigsaw, or miter saw will help you cut your wood to size.
    • A Drill: To create pilot holes and fasten your desk together.
    • Screwdriver: A trusty companion for attaching your hardware.
    • Clamps: To secure your wood while you’re working.
    • Sandpaper: To smooth out any rough edges and give your desk a polished finish.
    • Measuring Tape: For precise cutting and ensuring everything fits perfectly.
    • Wood Glue: A strong bond for creating sturdy joints.
    • Wood Stain or Paint: To give your desk its personality and desired color.
    • Hardware: Think screws, hinges, drawer slidesâ€"whatever your desk design calls for.

    Building Your Tiny Desk: A Step-by-Step Guide

    Okay, let's dive into the construction! Follow these steps and you’ll be on your way to a desk that’s as unique as you are:

    Step 1: Cutting the Pieces

    It’s time to turn your rough sketch into reality! Using your measured dimensions, cut your chosen wood into the necessary pieces. If you’re working with plywood, measure carefully, and use a circular saw or jigsaw for precise cuts. For solid wood, a miter saw can help create smooth, clean angles. Remember to add a bit of extra length for later sanding.

    Step 2: Assembly Time

    Now for the fun partâ€"bringing your desk together! Use your chosen wood glue and screws to fasten the pieces together. For added stability, consider adding pocket holes, dado joints, or dowel joints. If you’re building a floating desk, make sure to attach sturdy brackets to the wall for secure support.

    Step 3: Sanding & Finishing Touches

    Take your sandpaper and smooth out any rough edges and imperfections. This step is crucial for giving your desk a smooth, professional look. Once you’re happy with the surface, apply your desired stain or paint, letting each coat dry completely before moving on to the next.

    Step 4: Adding Hardware

    Time to add the finishing touches! Attach any drawer slides, hinges, or other hardware that you’ve chosen for your desk. Make sure to use the correct screws and pilot holes for your chosen hardware. If you’re building a floating desk, now’s the time to attach the sturdy brackets to the wall.

    Adding Personal Style to Your Mini Desk

    Now that your desk has a solid foundation, let's get creative and add your own signature touch. Think about these ideas:

    • Color and Finish: Play with colors and finishes to create a desk that reflects your personality. Consider using a bold color, a distressed look, or a natural wood finish.
    • Unique Features: Add a touch of whimsy with built-in shelves for displaying your favorite items. Create a hidden compartment for storing your secrets.
    • Organizational Solutions: Don't forget about the practical side of things. Add drawer organizers, pencil holders, or a multi-tiered shelf to keep your workspace tidy.
    • Lighting: A stylish desk lamp can brighten your workspace and add an elegant touch. Choose a lamp with adjustable lighting to suit your needs.

    Your DIY Desk: A Triumph Over Tiny Spaces

    Congratulations, my friend! You’ve just built a desk that's not just functional, it's a testament to your creativity and woodworking skills. Your compact desk will be a shining example of how to make the most of your small space. Remember, this is your creation, so add those personal touches that make it truly your own. Now, go forth and work in style!

    Read More..
    Unlocking the secrets of a wooden magic box diy

    Unlocking the Secrets of a Wooden Magic Box: A DIY Guide to Enchantment

    Have you ever dreamt of crafting a mysterious wooden box that holds secrets, whispers of magic, and a touch of the fantastical? Imagine the delight of revealing hidden compartments, unveiling intricate puzzles, and experiencing the thrill of unlocking the secrets within. This DIY project will guide you through the enchanting process of building your own wooden magic box, a treasure chest brimming with possibilities.

    Crafting Your Enchanting Canvas

    Begin by selecting a sturdy wooden box, a canvas upon which you'll weave your enchantment. Choose a size that resonates with your vision, whether it's a compact treasure chest or a grander display of magic. Consider the wood's grain and texture â€" will it be a smooth and polished surface or a rough and rustic one, each reflecting a different magical charm?

    Designing the Enchantments

    Now, it's time to ignite your imagination and design the secrets your magic box will hold. Do you desire hidden compartments, intricate puzzles, or perhaps a secret message revealed only through a hidden mechanism? Draw sketches, experiment with different concepts, and envision how these enchantments will come to life.

    The Magic of Hidden Compartments

    Hidden compartments, those whispered promises of hidden treasures, add a thrilling layer of intrigue to your magic box. There are many ways to construct them. You can create false bottoms with cleverly concealed hinges, utilize sliding panels that vanish into the box's depths, or even carve out secret niches within the wood itself.

    Crafting Compartment Secrets

    To build a false bottom, carefully attach a hinged panel to the bottom of the box, ensuring it fits snugly and seamlessly blends with the surrounding wood. For sliding panels, use a groove system to guide the panel as it slides effortlessly into its hiding place. Carved niches provide a more intricate and hidden option, where compartments are cleverly concealed within the wood's structure.

    Unlocking Secrets with Puzzles

    Introduce a touch of challenge with intricately designed puzzles that unlock the secrets within your box. These puzzles can range from simple sliding mechanisms to complex mazes carved into the wood, adding an extra layer of engagement and wonder to your creation.

    Weaving Puzzles of Intrigue

    A simple sliding puzzle can be achieved by incorporating small wooden blocks that move along grooves, requiring the user to solve a sequence to unlock the compartment. For a more complex challenge, carve a maze into the box's surface, requiring careful manipulation of a small object to reach the hidden compartment's release mechanism.

    Decorating Your Magical Masterpiece

    With your secrets concealed, it's time to decorate your magic box, imbuing it with your personal touch of enchantment. Paint it with mystical colors, adorn it with intricate carvings, or embellish it with gleaming brass accents â€" the possibilities are boundless.

    Adding a Touch of Mystique

    You can add a sense of intrigue with vibrant hues, incorporating shades of midnight blue, emerald green, or deep crimson to evoke a sense of mystery. Consider adding subtle details like metallic accents, glowing gems, or ancient-looking runes to further enhance the magical ambiance.

    The Final Touch: Revelation and Wonder

    As your wooden magic box takes shape, consider the final touch â€" the reveal of its secrets. Will it be a subtle click, a gentle slide, or a more dramatic flourish? Let your imagination guide you as you design the moment your magic box unveils its hidden treasures, enchanting all who behold its secrets.

    The Moment of Truth

    For a dramatic reveal, you can integrate a spring-loaded mechanism that releases the hidden compartment with a satisfying "pop" sound. Alternatively, create a hidden lever that, when activated, opens a concealed section with a flourish. The reveal should be as captivating as the secrets it hides.

    Your wooden magic box, imbued with secrets and wonder, stands as a testament to your imagination and craftsmanship. With every unlock, you'll unveil the mysteries within, sharing the magic you've created with those who dare to explore its hidden depths.

    Read More..
    Diy wooden gun cabinet: how to create a custom secure storage space

    DIY Wooden Gun Cabinet: How to Create a Custom Secure Storage Space

    Owning firearms comes with a significant responsibility: secure storage. While commercially available gun cabinets offer convenience, building a custom wooden gun cabinet allows you to tailor the design to your specific needs and preferences. This project combines woodworking skills with security considerations, ensuring both safety and aesthetic appeal.

    Planning Your Custom Gun Cabinet

    Before you dive into construction, spend time meticulously planning your gun cabinet. This step sets the foundation for a successful project.

    Determine the Cabinet's Dimensions and Features

    Consider the size and number of firearms you intend to store. Measure the space where the cabinet will be placed to ensure a proper fit. Think about additional features you desire, such as shelves, drawers, or compartments for accessories.

    Choose the Right Wood

    Select a sturdy hardwood like oak, maple, or walnut for its durability and visual appeal. Ensure the wood is properly seasoned to prevent warping and cracking.

    Design the Security Features

    Consider the level of security required for your firearms. You can incorporate features such as heavy-duty hinges, multiple locks, and reinforced door panels.

    Select Hardware and Finishing Touches

    Choose high-quality hinges, locks, and handles that complement the cabinet's style. Select a stain and finish that enhances the wood's natural beauty and provides protection.

    Constructing the Cabinet

    With your plan in hand, you can begin building the gun cabinet. Follow these steps for a secure and well-crafted storage solution.

    Cut and Assemble the Cabinet Body

    Use a table saw or circular saw to accurately cut the wood for the cabinet sides, top, bottom, and back. Assemble the frame using wood glue and screws for maximum strength.

    Install the Shelves and Drawers

    If you're incorporating shelves or drawers, cut and assemble these components according to your plan. Ensure the shelves are sturdy enough to hold your firearms.

    Create the Door

    Cut and assemble the door frame, incorporating any extra layers for security. Install the hinges and lock mechanism securely.

    Finish the Cabinet

    Sand the cabinet smoothly to remove any rough edges. Apply a wood stain and finish to enhance the wood's natural beauty and protect it from moisture.

    Securing Your Gun Cabinet

    A secure gun cabinet is paramount for preventing unauthorized access. Consider these essential steps:

    Secure the Cabinet to the Wall

    Mount the cabinet to the wall using heavy-duty bolts or screws to prevent theft. This will deter potential intruders from removing the entire cabinet.

    Install a High-Quality Lock

    Choose a lock with a strong deadbolt and a keyhole that is difficult to pick. Consider a combination lock for added security.

    Consider a Gun Safe

    For ultimate security, consider incorporating a gun safe within the cabinet. These specialized safes offer advanced security features like fire resistance and tamper-proof construction.

    Final Touches and Enjoy Your Custom Cabinet

    After securing your gun cabinet, take pride in your handcrafted creation. Display your firearms responsibly and ensure that all necessary safety precautions are in place. This custom-built cabinet not only provides secure storage for your firearms but also adds a touch of personalized craftsmanship to your home.

    Read More..